Lab 1.4 Your AWS Lab Workbench
Find your way around AWS and run a small CPU exercise
Goal
Use AWS as an optional place to do the course’s small computing exercises. Learn which account and Region you are using, what you will pay for, where your files live, and how to finish a session without leaving a machine running.
Background
The first lessons separate a model’s computation from the system around it. Moving an exercise to AWS changes where that computation runs and who operates the machine. The text, mathematical question, and evidence requirements still come from the original Lab.
An EC2 instance supplies CPU and RAM. Its EBS volume is the disk holding the operating system, packages, model cache, and results. S3 stores objects in buckets independently of a machine; it is not automatically your instance’s filesystem. This session needs EC2 and one EBS volume, with no S3 bucket. EBS volumes; S3 overview
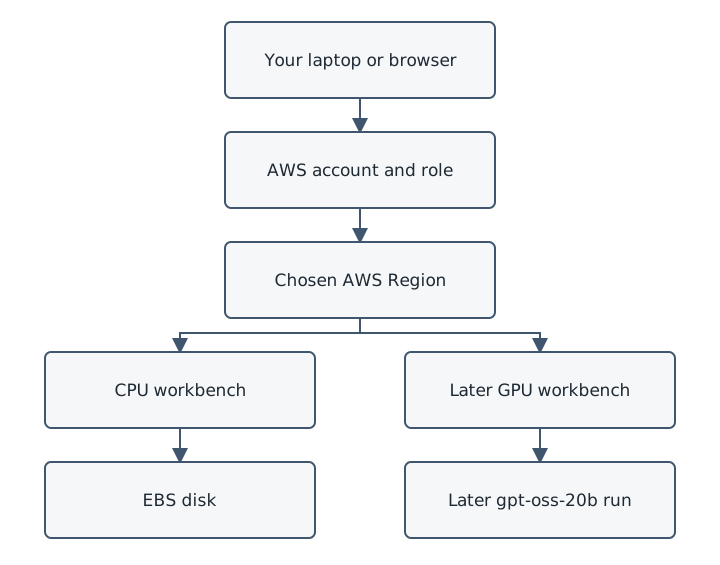
This is an orientation map, not a literal network-packet diagram. Follow the CPU route in this Lab. The branch labeled “Later” is a separately priced session; you will not launch it here. Your browser controls the remote computer. Its EBS disk remains a separate resource to account for.
Prerequisites
Complete the first three Labs and be comfortable entering commands in a terminal. No previous AWS experience is assumed. The original local and paper routes remain valid; cloud execution does not change a Lab’s scientific question or completion criteria.
Time: about 40–60 minutes for Stage 0; another 25–45 minutes for the optional CPU session. Account setup or permission changes may take longer and should happen before a paid session.
Expected artifact: aws-workbench.md, a short cost worksheet, and a resource inventory. If you launch a machine, also save its environment record, the actual toy-run output, and cleanup evidence.
Use a separate learning account or an instructor-approved sandbox, not an employer’s production environment. Have the account owner identify the permitted Region, spending allowance, sign-in method, and person who can resolve access problems.
You need a non-root identity that can inspect the relevant resources and billing information. To do Stage 1, it must also permit this one-instance lifecycle and the chosen connection method. An instructor can prepare these permissions and a suitable network in advance. Do not work around a denied operation by switching to root or granting yourself broad administrator access.
For a personal account, complete AWS’s current account setup and security guidance separately. The owner personally handles payment details, authentication, MFA enrollment, and any security changes. Protect root access and use a non-root identity for course work. AWS recommends federated access with temporary credentials, commonly through IAM Identity Center; an existing organization-approved IAM sign-in is another possibility. This Lab does not require long-lived AWS access keys. IAM best practices; root-user guidance
Workflow
- Stage 0: sign in, identify the account and Region, read the billing baseline, price a CPU workbench, verify a budget, and map the resources. You can finish this stage without launching compute.
- Stage 1, optional: launch one approved CPU instance, connect through your browser, run the existing tiny fixture, export the evidence, and verify cleanup.
- Reuse: keep a short workbench record for later course sessions. Recheck each Lab’s own software and resource requirements before running it.
AWS Budgets sends warnings; an alert-only budget does not stop a running instance. Usage and billing updates can lag, so costs can pass a threshold before you hear about it. Use a priced session plan, a clock, and verified cleanup as well as alerts. A worksheet’s spending ceiling is your decision rule, not an AWS-enforced cap. AWS Budgets guidance
Tasks
Stage 0 — Orient and plan without launching
1. Sign in and identify where you are
- Open the AWS access portal supplied by your administrator, or the official AWS sign-in page for your approved identity. Complete sign-in and MFA yourself. For IAM Identity Center, select the assigned account and role. Follow the access-portal guide if your organization uses it.
- Inspect the console’s account/identity menu. Confirm the intended account and role or user. If you are signed in as root, leave that session and use the prepared course identity.
- Open Amazon EC2 using the console’s service search. Inspect the Region selector and choose the approved Region. Record its code, such as
eu-west-2, together with its displayed name. The example is a format illustration, not a required location. - Find the Instances list, then EBS Volumes and Snapshots. Observe which account and Region each view covers. Do not create anything yet.
Console layouts and labels change. Navigate by service and object names; consult the linked AWS instructions when a label differs rather than following an old screenshot blindly.
Checkpoint: write one sentence distinguishing an AWS account, your signed-in identity, a Region, and an EC2 instance. An account holds resources and permissions; an identity determines what you can do; a Region locates regional resources; an instance is a virtual machine. Changing the Region selector changes your view; it does not move an existing instance. EC2 Regions and Zones
2. Read the bill before adding anything
- Open Billing and Cost Management and inspect the current billing period. Record the displayed cost, currency, scope, and the time you checked. If available, note when the data was updated.
- Inspect the account’s plan and any credit eligibility or expiry. Do not assume a free offer covers your selected instance, or that a credit balance is a general spending cap. Free and paid account plans have different restrictions; upgrading or joining an organization can change them. Do not upgrade as an incidental troubleshooting step. AWS account plans
- Determine whether you are seeing this learning account, an organization-wide bill, or a filtered view. Existing charges belong in your baseline. Ask the owner about unfamiliar usage rather than deleting resources to make a number disappear.
If billing access is denied, ask the owner to arrange the relevant view or review it with you. Resource access and billing access are separate permissions. Record the blocker and continue the documentation-only parts; do not launch without a way to monitor the approved account’s costs. Billing access
Output: a dated baseline in your private workbench note. Use a masked account label in any submitted screenshot and exclude payment information.
3. Choose and price a modest workbench
For this introductory workbench, price the following concrete starting configuration:
- One Linux On-Demand, shared-tenancy, CPU-only instance with 2 vCPUs and 8 GiB RAM.
m7i.largeis one matching x86_64 example in AWS’s M7i specification. Check that it is offered in your Region and allowed by your account. This is a course planning choice, not a measured minimum or a claim that it is the cheapest option. - A current Amazon Linux 2023 standard x86_64 AMI from Amazon, with no paid Marketplace software. Record the actual AMI ID and publisher; the identifier varies by Region and release. Use the standard image, not the minimal or ECS-optimized image, for the browser connection described below.
- One 30 GiB gp3 EBS root volume, using the included baseline performance settings. This is a modest working-space allowance for small files and Python environments. Frameworks and caches can be much larger than model weights. Keep encryption enabled with the account-approved key, and plan to delete this disposable root volume on termination.
- One automatically assigned public IPv4 address for the browser-connection route, with its cost included. No Elastic IP, load balancer, NAT gateway, extra disk, paid image, or reservation is needed for this route. If your organization supplies a private-network connection instead, have its owner account for that route’s costs.
Open the AWS Pricing Calculator and the current EC2, EBS, and public IPv4 pricing pages. Select your actual Region, operating system, purchase option, and instance type. Do not copy a price from an undated tutorial.
Fill this worksheet before Stage 1. Put the unit beside every number; distinguish a per-hour price from a monthly storage price. Use the calculator’s time/unit conventions for storage rather than assuming every month has the same number of hours.
| Item | Your quantity and retention | Current estimate and source date |
|---|---|---|
| EC2 compute | One instance; planned running hours, including setup and cleanup | Amount, currency, hourly rate |
| EBS storage | 30 GiB; time from creation until deletion | Amount, currency, calculator assumptions |
| Public IPv4 | One address; assigned hours | Amount, currency, hourly rate |
| Data transfer or other charges | Expected result export; any approved extras | Amount or explicit unresolved item |
| Tax and allowance for overruns | Account-specific tax treatment and a chosen reserve | Amount and reason |
| Session total | Sum before credits; credits shown separately if confirmed applicable | Estimate, not a guaranteed final bill |
Write a maximum approved session spend, a monthly account budget, and a cleanup deadline. These are different quantities. For the first session, plan to finish within one hour after launch, including setup, and set a reminder early enough to export results and terminate before that hour ends. If the priced plan exceeds the owner’s allowance, use the local route or revise the plan before launch.
In Service Quotas, inspect Amazon EC2 in the same Region. Find the applied On-Demand Standard quota covering M instances and compare available headroom with the selected instance’s vCPUs. Quotas are counted in vCPUs, not simply machines. Later GPU families use different quota groups, which can start at zero; a CPU quota does not authorize a GPU. A sufficient quota also does not guarantee that AWS has capacity at launch time. EC2 quotas; capacity errors
Prediction: which charges would continue if you stopped the instance overnight instead of deleting the workbench? Write your answer before Step 8.
4. Set a warning you will actually see
Use an existing owner-approved budget if it covers this account and is visible to the responsible person. Otherwise, with the owner’s agreement, create one alert-only cost budget in Billing and Cost Management. Follow AWS’s current cost-budget procedure.
- Choose a monthly period and fixed amount matching the worksheet. Verify the selected account or billing view. For a dedicated learning account, cover all its services rather than filtering to EC2 and missing storage or networking.
- Record the cost basis and whether credits, refunds, tax, and support charges are included. Prefer a view that makes underlying usage visible; a credit-adjusted zero can hide consumption. In a shared account, ask the owner which existing scope and baseline to use.
- Add actual-cost email alerts at 50%, 80%, and 100% of the chosen monthly amount. These percentages are course suggestions, not AWS defaults. Add a forecast alert at 100% if forecasting is available; new accounts may not yet have enough history.
- Send alerts to an address you monitor. Review the address and thresholds, leave budget actions and paid scheduled reports out of this exercise, save, then reopen the budget to verify the saved configuration. Keep any delivery status separate from your configuration check: a saved email address does not prove an alert reached your inbox.
AWS currently lists budget monitoring and notifications as free; action-enabled budgets and scheduled reports have separate pricing. Budgets pricing
Checkpoint: explain what you would do if an alert arrived while the instance was running. Include exporting what you need, stopping further work, and checking the resource inventory. Do not spend money merely to test an alert.
5. Make a resource map
Create a small inventory with columns for resource type, Region, identifier, owner/purpose, state, and retention/cleanup decision. Record the current course-related resources, including an explicit “none found” where appropriate. Mark views you cannot inspect as unverified.
Find these lists now, while there is no running-session clock:
- EC2 Instances, including stopped instances
- EBS Volumes and Snapshots
- Elastic IP addresses
- S3 buckets, if the account already uses them
Do not alter someone else’s resources. A selected Region’s empty Instances list is not proof that the whole account has no chargeable resources. Check the Regions used for your work, and reconcile unfamiliar billing services with the owner.
Stage 0 stopping point: you can identify the account and Region, explain the resource map, price one session, and verify the budget configuration or clearly document what remains blocked. Save the plan even if you choose not to launch. An unfinished access or cost check is a reason to defer Stage 1.
Stage 1 — Run one small CPU session
6. Launch and connect to the approved configuration
Read Steps 7 and 8 before launching. Obtain the payer’s agreement to the worksheet’s configuration, total allowance, and cleanup time. If you are the payer, record that decision yourself. This is a one-off On-Demand session, not a Savings Plan, Reserved Instance, or recurring service purchase.
The default access route here is EC2 Instance Connect in your browser. It uses your authorized AWS identity without requiring a downloaded persistent SSH private key. The standard AL2023 AMI includes the needed package. Have the administrator confirm the required EC2 Instance Connect permissions and a suitable network before launch. AWS’s IAM setup guide explains how to scope the connection permission to the intended instance and operating-system user. Connection prerequisites; supported images
- In the chosen Region’s EC2 launch flow, enter a name such as
llm-course-cpu, choose the recorded Amazon Linux image and instance type, and set the count to one. Verify On-Demand purchasing and the worksheet’s storage settings. - Use the approved public subnet with a route to an internet gateway and enable an automatically assigned public IPv4 address. Reuse an instructor-prepared network where possible. If no suitable network exists, have the owner prepare one; do not add a NAT gateway as a quick fix.
- For browser EC2 Instance Connect, use a dedicated security group with inbound TCP port 22 from the Region’s AWS-managed EC2 Instance Connect IPv4 prefix list, named
com.amazonaws.REGION.ec2-instance-connectwith your Region code substituted. Use the actual prefix-list selector or the administrator’s prepared security group. “My IP” is for direct SSH from your computer and is not the source of this browser connection. No public HTTP, notebook, or model-server port is needed. Never select an all-address source just to get past a connection failure. Preserve the approved outbound rules needed for package and course downloads. - For this confirmed Instance Connect route, no persistent EC2 key pair is required. Do not create an AWS access key or attach a broad instance role. Review the final summary, the root volume’s Delete on termination setting, and any unexpected paid add-on or permission prompt before launching. You personally handle authentication and security confirmations.
- Launch once, record the instance, volume, and security-group identifiers in the inventory, and start your session clock. Wait for the instance to become running and its status checks to pass. Open its Connect view, select EC2 Instance Connect with the public address, verify the AL2023 username
ec2-user, and connect. AWS browser-connection procedure
If connection or launch fails, keep the error and check the account, Region, image, IAM permissions, public address, subnet route, and security group against the prerequisites. The browser also needs outbound HTTPS/WebSocket access on port 443 to the Region’s Instance Connect proxy; ask your network administrator about a blocked VPN or firewall rather than disabling it. Inspect the instance list before retrying so you do not launch duplicates. Avoid switching to a larger machine or a different Region without repricing. If the clock is running while you investigate, stop the instance or complete cleanup and debug from the saved record.
7. Run a known small fixture
The first run verifies your workbench, not an LLM’s intelligence. Use the existing standard-library toy runner. It performs a tiny deterministic vector calculation and writes JSON; it needs no package installation, model weights, or AWS credentials. You will study its residual-stream interpretation in Lab 2.2; note this prior exposure when you reach that Lab’s prediction exercise.
Before running, predict whether moving this same calculation to AWS should change its integer vectors. Also predict whether signing out of the console will stop its host machine.
In the instance’s terminal, create a new directory and record the environment:
set -e
set -o noclobber
mkdir -p ~/llm-course
cd ~/llm-course
mkdir workbench-01
cd workbench-01
date -u > environment.txt
uname -srm >> environment.txt
python3 --version >> environment.txt
free -h >> environment.txt
df -h . >> environment.txt
If workbench-01 exists, choose a new name rather than overwriting an earlier session. Inspect the RAM and free disk output; they are observations of this machine, not numbers to copy from the plan.
Open the toy-runner link above in your local browser, copy its course download URL, then use that HTTPS URL below. This downloads an ordinary public course file into the instance. Read it before execution; do not paste a private repository URL, signed download token, or credential into your record.
read -r -p "Course toy-runner HTTPS URL: " TOY_URL
curl --fail --location --proto '=https' --proto-redir '=https' \
  --output trace_residual_toy.py "$TOY_URL"
python3 -m py_compile trace_residual_toy.py
sha256sum trace_residual_toy.py > source-sha256.txt
cat trace_residual_toy.py
Continue only if the download and syntax check succeeded and the displayed file is the small course runner. The shell settings above stop on a failed command and prevent > from overwriting an existing output file. A failure may close this terminal; the instance keeps running, so reconnect or use the console to clean up. After inspecting it, run twice into new files:
python3 trace_residual_toy.py > run-01.json
python3 trace_residual_toy.py > run-02.json
python3 - <<'PY'
import json
from pathlib import Path

a = json.loads(Path("run-01.json").read_text())
b = json.loads(Path("run-02.json").read_text())
if a != b:
    raise SystemExit("Repeated toy runs differ; inspect both files")
if a["baseline"]["vectors"]["final"] != [4, 0, -1]:
    raise SystemExit("Unexpected baseline vector; inspect the source and output")
if a["baseline"]["readout"] != -1:
    raise SystemExit("Unexpected baseline readout")
print("Toy repeat check passed")
PY
The vector [4, 0, -1] and readout -1 are analytically expected values from the existing fixture. Your two JSON files are the evidence that your machine ran it. A passed check establishes this small computation and file workflow; it does not establish a model benchmark or compatibility with every later Lab.
Copy environment.txt, source-sha256.txt, both JSON files, and your predictions back to your own notes before cleanup. For this tiny text-only exercise, displaying each file with cat and saving the complete text locally is enough; reopen the copies and confirm that each JSON parses. Use your organization’s approved file-transfer method for larger future artifacts. Do not expose a web server or make a bucket public to download results.
8. End the session and verify what remains
Closing a terminal, logging out of the console, or leaving Python idle does not terminate an EC2 instance. Stopping an EBS-backed instance preserves its EBS disks, which can continue to incur storage charges. Terminating ends the instance, but whether each EBS volume is deleted depends on its deletion setting. Snapshots, S3 objects, and allocated Elastic IPs have separate lifecycles. Stop/start behavior; termination behavior
- Confirm the saved results open on your own computer. Record the elapsed running time and any failure or unplanned work.
- For this first disposable workbench, select the exact instance in EC2 and terminate it. Read the warning: files on a deleted root volume cannot be recovered through a later restart. Wait until the instance shows
terminated. - Inspect EBS Volumes using the recorded volume ID. Verify the intended root-volume deletion rather than assuming termination removed it. If it remains, decide whether to retain it with a priced deadline or delete it after verifying the export. Delete only your documented disposable resources. Ask the owner whether backup or Recycle Bin retention rules retain deleted resources and their costs; do not override those rules to force immediate removal.
- Check your inventory for snapshots, Elastic IPs, extra volumes, or other resources created during troubleshooting. The described route creates none of those extras. Reconcile any that exist with their owner; an empty instance list alone is insufficient. Remove the dedicated security group only if no remaining resource uses it and it belongs solely to this exercise.
- Update the inventory with each resource’s observed final state. Revisit Billing and Budgets after usage data has had time to arrive, for example the following day, and compare it with the worksheet. Record pending or unexplained charges and revisit them; an immediate zero display is not proof of a zero final bill.
For a later multi-session workbench, you may deliberately stop and retain storage instead of terminating, but price that retention, record the next review/deletion date, and check the actual stopped state. Your operating-system shutdown behavior and a billing alert are not substitutes for this console check.
Reuse the workbench for small Labs
Recheck the cost plan and resource state at the start and end of every session. Each Lab’s original dependencies, model choice, fixtures, predictions, limits, and acceptance checks still apply. Use CPU explicitly where the Lab requires it.
- Lab 1.2, tokenization: use its runner and requirements, in a separate virtual environment. Its reference is CPython 3.13.13 with Tokenizers 0.20.3, installed with the Lab’s
--no-depscommand. It downloads tokenizer artifacts, not neural weights. - Lab 2.2, Pythia-14M: use its runner, requirements, pinned six-file specimen, and Linux CPU-wheel installation instructions. The stated core stack is CPython 3.13.13, PyTorch 2.9.0, Transformers 4.57.1, Tokenizers 0.22.1, Safetensors 0.6.2, and Hugging Face Hub 0.35.3. Inspect
--planbefore downloading. Do not install CUDA packages merely because the machine is in AWS.
AL2023’s python3 is its system Python 3.9; the toy works without changing that system installation. AWS also provides separately named newer Python versions. Inspect the actual version you install and invoke the appropriate executable explicitly; do not replace the system python3 symlink. Installing a package named python3.13 does not by itself prove that its patch version matches the course’s reference. Arrange the required course environment before claiming an exact-version run. Python on AL2023
For an approved later CPU session, install uv in your user directory and ask it for the exact course interpreter. Read the official installer instructions before running the downloaded script. These downloads consume setup time and disk; include them in that session’s plan, not the first toy-only run. In the instance terminal, use a fresh directory (choose another name if it exists):
set -e
mkdir -p "$HOME/llm-course"
mkdir "$HOME/llm-course/python-setup-01"
cd "$HOME/llm-course/python-setup-01"
curl --fail --location --proto '=https' --proto-redir '=https' \
  --output uv-install.sh https://astral.sh/uv/install.sh
less uv-install.sh
Continue only after reviewing the script; press q to leave less. Install without sudo or shell-profile changes, then create two separate environments:
UV_INSTALL_DIR="$HOME/.local/bin" UV_NO_MODIFY_PATH=1 sh uv-install.sh
UV="$HOME/.local/bin/uv"
"$UV" --version > python-setup.txt
"$UV" python install --no-bin 3.13.13
for ENV in tokenizer residual; do
  "$UV" venv --managed-python --python 3.13.13 --seed \
    "$PWD/$ENV-venv"
  "$PWD/$ENV-venv/bin/python" -c \
    'import sys; print(sys.executable, sys.version); assert sys.version_info[:3] == (3, 13, 13)' \
    >> python-setup.txt
done
cat python-setup.txt
The installer options keep the shell profile unchanged. uv supplies Astral-managed Python builds; this does not replace AL2023’s system Python. --no-bin avoids installing Python launchers outside the environments, and --seed supplies pip for the original Labs’ commands. Command reference; isolated environments
Activate source "$HOME/llm-course/python-setup-01/tokenizer-venv/bin/activate" for Lab 1.2, or the corresponding residual-venv/bin/activate for Lab 2.2; run deactivate before switching. If you chose another directory name, substitute it. Use that Lab’s existing pinned installation and validation commands inside its environment, preserving --no-deps and the CPU-wheel instructions where specified. Save python-setup.txt with your environment evidence. If the exact interpreter is unavailable or any check fails, retain the error and clean up on schedule; do not substitute a patch version or claim an exact-version run.
Later Labs can impose additional memory, disk, operating-system, package-build, and replay requirements. In particular, a CPU wheel may report a build suffix such as +cpu; a strict runner can reject that string even when its version number looks similar. Preserve the error rather than editing a version check to force a pass. Moving from a prior laptop environment to Linux also creates a new environment: do not label its measurements a verified replay of older evidence without the Lab’s required checks. The small workbench is a starting configuration, not a guarantee that every course workload fits it.
Keep a reusable workbench record
Finish aws-workbench.md with this compact handoff for future sessions:
- Access: private account label, non-root identity/role, sign-in route, approved Region, and who handles access problems
- Costs: dated billing baseline; worksheet, session allowance and deadline; budget scope, thresholds, recipient check, and last verification time
- Workbench: instance/AMI type, CPU/RAM/disk observations, connection method, relevant software versions, and source hashes
- Evidence: predictions, actual run outputs, checks, failures, and where the local exported copies are saved
- Lifecycle: each recorded resource’s final state; any deliberately retained storage and its deadline; next billing review and unresolved items
A Stage 0 submission records a priced, inspected plan or a specific blocker, and says no compute launched. A Stage 1 submission additionally supplies actual execution and cleanup evidence. Neither should invent a successful run, a delivered alert, or a settled bill.
Later, Lab 6.3 uses this record when choosing a GPU machine for gpt-oss-20b, and Lab 6.4 repeats a familiar measurement. Those are separately priced sessions with their own memory and compatibility checks. Independent investigation follows that guided practice.
What did we just do?
You separated the experiment from the computer hosting it. In Stage 0, you identified who can act, where resources live, and what a session could cost. If you completed Stage 1, you also collected real evidence from a remote CPU and checked its lifecycle afterward.
Answer three questions in your closing note:
- Did the cloud location change the toy’s integer result? What evidence supports your answer, or what remains untested?
- Why can storage still cost money after an instance is stopped, and what did your inventory show after cleanup?
- What must you verify again before running the next Lab, even if this workbench passed its smoke test?
AWS documentation and the existing course runner/requirements were checked on 9 October 2026. The suggested workbench sizing and session duration are instructional choices, not measured capacity or cost guarantees. No AWS deployment or end-to-end cloud execution is represented as having been performed to author this Lab.
More Learning
- AWS IAM security best practices: understand temporary credentials, roles, MFA, and least privilege.
- AWS Budgets: distinguish actual usage, forecasts, update delays, and alert thresholds.
- EC2 Instance Connect prerequisites: explain why browser connections need the service’s source range and the correct IAM permissions.
- Amazon EBS volumes: understand why a virtual disk has its own lifecycle.
- EC2 launch troubleshooting: distinguish quota, capacity, configuration, and permission failures.